Adding Enemies
WeaverCore provides an easy way for both creating and testing new enemies and bosses.
To get started, first add in a template enemy via WeaverCore -> Insert -> Template Enemy.
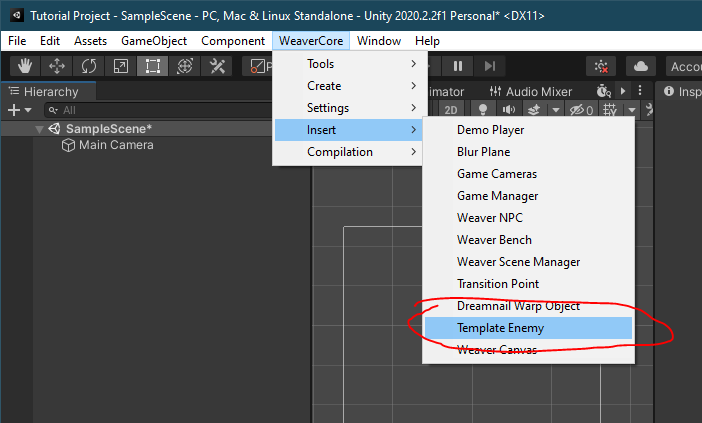
This will insert a template enemy that has most of the components we need to build our new enemy:
| Component | Description |
|---|---|
| Sprite Renderer | Used for rendering a face sprite on the enemy |
| Sprite Flasher | Causes the sprite to flash a certain color when hit |
| Player Damager | Causes the player to take damage when colliding with the enemy |
| Box Collider 2D | Allows other objects, like the player, to come in contact with this enemy |
| Rigidbody 2D | Allows the enemy to interact with it's enviroment, and have gravity applied to it |
| Entity Health | Keeps track of how much health the enemy has left |
| Recoiler | Used to recoil the enemy backwards when the player hits it |
| Enemy Dreamnail Reaction | Allows the player to dreamnail this enemy for soul. This component can also be customized to display a message when dreamnailed |
You can find more information about these components by going over to the API Documentation.
These components have most of what we need for the enemy to function, but there are a few missing ones that we need to fill in ourselves.
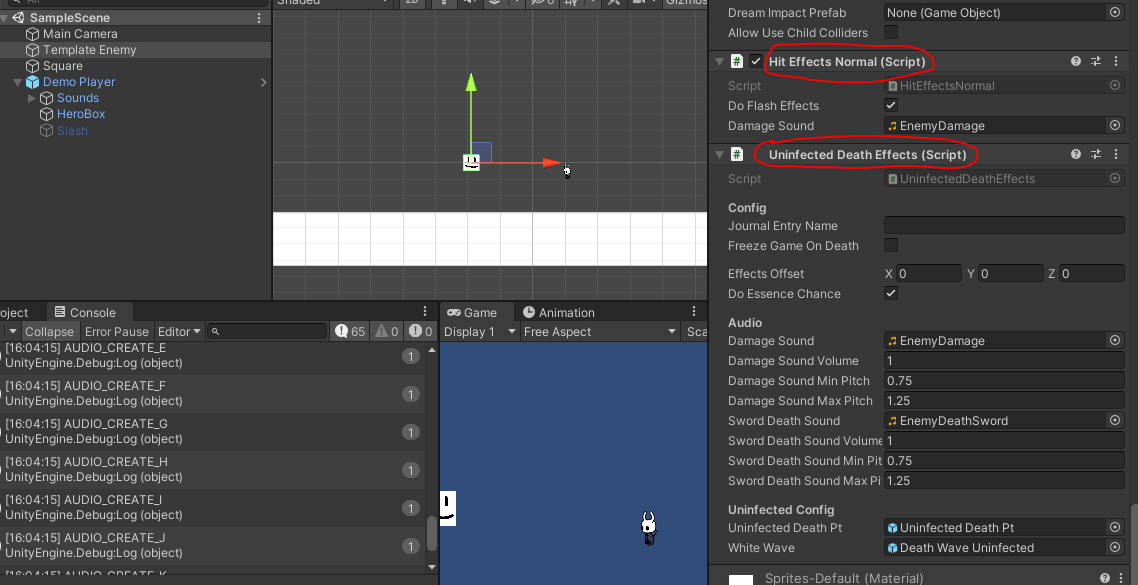
Hit Effects
What kind of effects should be played when the enemy gets hit? In WeaverCore, there are two main kinds of hit effects:
- The HitEffectsNormal component, for enemies that aren't infected, like Hornet or Grimm
- The HitEffectsInfected component, for enemies that are infected
Be sure to add either one of these components to your enemy, or you can build your own by creating a component that inherits from IHitEffects. Not having Hit Effects component will cause the enemy to emit nothing when hit
Death effects
What kind of effects should be played when the enemy dies? Just like with HitEffects, there are two main kinds of Death Effects:
- The UninfectedDeathEffects component, for enemies that aren't infected
- The InfectedDeathEffects component, for enemies that are infected
Be sure to have either one of these components attached to have death effects play for the enemy, or you can build your own by creating a script that inherits from IDeathEffects or BasicDeathEffects
Enemy Logic
The final thing to do is to create a new script that inherits from Enemy, which will house the main logic for our Enemy, and add it to the Enemy Object:
using System.Collections;
using System.Collections.Generic;
using UnityEngine;
using WeaverCore.Features;

public class CustomEnemy : Enemy
{

}
For this tutorial, we will create an enemy that has two moves, a slide move, and a lunge move. The slide move will slide on the ground to move towards the player, and the lunge move will do a lunge towards the player.
In WeaverCore, we can split these two moves into their own objects by creating two classes that inherit from IEnemyMove
using System.Collections;
using System.Collections.Generic;
using UnityEngine;
using WeaverCore.Features;
using WeaverCore.Interfaces;

//CustomEnemy.cs
public class CustomEnemy : Enemy
{
    void Start()
	{

	}
}

//SlideMove.cs
public class SlideMove : MonoBehaviour, IEnemyMove
{
    public bool MoveEnabled => true;

    public IEnumerator DoMove()
    {
        yield break;
    }

    public void OnCancel()
    {

    }

    public void OnDeath()
    {

    }
}

//LungeMove.cs
public class LungeMove : MonoBehaviour, IEnemyMove
{
    public bool MoveEnabled => true;

    public IEnumerator DoMove()
    {
        yield break;
    }

    public void OnCancel()
    {

    }

    public void OnDeath()
    {

    }
}
IEnemyMove has 4 major parts to it:
- MoveEnabled is used to tell if the move is active or not
- DoMove contains the move's main functionality
- OnCancel is called when the move is abruptly cancelled
- OnDeath is called when the enemy dies (looses all of it's health)
Note
You don't need to have the moves inherit from MonoBehaviour, but for this tutorial, we will be using it so that we can add the moves to the enemy object to make it easier to configure the moves
We can now add these new moves to the enemy object:
In the CustomEnemy Start() function, we can then use GetComponents
using System.Collections.Generic;
using WeaverCore.Features;
using WeaverCore.Interfaces;

public class CustomEnemy : Enemy
{
    IEnemyMove[] moves;

    void Start()
    {
        moves = GetComponents<IEnemyMove>();
    }
}
Now we need to decide how we want to run our moves. Do we want the moves to be done randomly? Do we want them to be run in an alternating pattern? Do we also want to have a delay before the next move gets run?
For this tutorial, we will simply run the moves in an alternating pattern, and there will also be a 0.5 second delay before the next move gets run.
We can do this by first starting up a coroutine function that will house our code for running the moves:
using System.Collections;
using System.Collections.Generic;
using UnityEngine;
using WeaverCore.Features;
using WeaverCore.Interfaces;

public class CustomEnemy : Enemy
{
    IEnemyMove[] moves;

    Coroutine mainRoutine;

    void Start()
    {
        moves = GetComponents<IEnemyMove>();

		//Start the main routine for executing the moves
        mainRoutine = StartCoroutine(MainRoutine());
    }

    IEnumerator MainRoutine()
    {
        //Loop forever
        while (true)
        {
			//Loop over each of the moves in the moves list
			//First the Lunge Move, then the Slide Move
            foreach (var move in moves)
            {
				//Run the move
                yield return RunMove(move);

				//Wait 0.5 seconds before going to the next move
                yield return new WaitForSeconds(0.5f);
            }
        }
    }
}
What this code will do is start up the MainRoutine() when the enemy starts up, and the routine will continuously alternate between the Lunge Move and the Slide move, with a 0.5 second delay between each move.
The Enemy class provides a function called RunMove which will execute the move for us. This function will also handle the OnCancel and OnDeath callbacks that IEnemyMove requires, so you should always use this function when you want to execute a move.
One issue with this code is that if the enemy dies, this coroutine doesn't stop running. The enemy will continue to slide and lunge towards the player even if the enemy has lost all of it's health. There are two ways this can be fixed:
Fix 1 : StopCoroutine
The first way to stop the coroutine when the enemy dies is to override the OnDeath function, which is called when the enemy dies. In this function, we can make a call to StopCoroutine to stop the MainRoutine from executing any moves after the enemy dies:
	...
    IEnumerator MainRoutine()
    {
		//Loop forever
        while (true)
        {
            foreach (var move in moves)
            {
                yield return RunMove(move);

				//Wait 0.5 seconds before going to the next move
                yield return new WaitForSeconds(0.5f);
            }
        }
    }
	//--//--//--//--//--//--//--//--//--//--//---
	//When the enemy dies, stop the main routine from executing any more moves
    protected override void OnDeath()
    {
        StopCoroutine(mainRoutine);
    }
	//--//--//--//--//--//--//--//--//--//--//---
Fix 2 : StartBoundRoutine
The other method is to instead use StartBoundRoutine provided by the Enemy class, instead of StartCoroutine. What StartBoundRoutine does is that it will start up a routine like normal, but when the enemy dies, the coroutine is automatically stopped:
    IEnemyMove[] moves;

	uint mainRoutineID;

    void Start()
    {
        moves = GetComponents<IEnemyMove>();

		//--//--//--//--//--//--//--//--
        mainRoutineID = StartBoundRoutine(MainRoutine());
		//--//--//--//--//--//--//--//--
    }
Implementing the Moves - Slide Move
Now It's time to implement the individual moves. We will start with creating the Slide Move. When the move is executed, it will slide along the ground in the direction of the player. It will do this for about 10 seconds before stopping:
using System.Collections;
using UnityEngine;
using WeaverCore;
using WeaverCore.Interfaces;
using WeaverCore.Utilities;

public class SlideMove : MonoBehaviour, IEnemyMove
{
    [SerializeField]
    float moveSpeed = 5f;

    [SerializeField]
    float moveDuration = 10;

    public bool MoveEnabled => true;

    Rigidbody2D rb;

    private void Awake()
    {
        rb = GetComponent<Rigidbody2D>();
    }

    public IEnumerator DoMove()
    {
        //Run the Move() function every frame until 10 seconds have elapsed
        yield return CoroutineUtilities.RunForPeriod(moveDuration, Move);

        //Stop moving when finished
        rb.velocity = Vector2.zero;
    }

    void Move()
    {
        //If the player is to the right of the enemy
        if (Player.Player1.transform.position.x >= transform.position.x)
        {
            //Set the horizontal velocity to move to the right
            rb.velocity = rb.velocity.With(x: moveSpeed);
        }
        //Otherwise, if the player is to the left of the enemy
        else
        {
            //Set the horizontal velocity to move to the left
            rb.velocity = rb.velocity.With(x: -moveSpeed);
        }
    }

    public void OnCancel()
    {
        //Stop moving if the move is cancelled
        rb.velocity = Vector2.zero;
    }

    public void OnDeath()
    {
        //Stop moving if the enemy dies while this move is running
        rb.velocity = Vector2.zero;
    }
}
You can read over the commented code to get an idea of what's going on, but there are a few new functions here:
- CoroutineUtilities.RunForPeriod is used to run a certain function every frame for a certain amount of time.
- Player.Player1 is used to get the main player in the game.
- The With extension method is useful if we only want to modify one field of a vector. In this case, we are using it to create a new vector with only the "X" field modified
Implementing the Moves - Lunge Move
Now for the Lunge Move. This move will cause the enemy to lunge towards the player, and the move will end when the enemy touches the ground:
using System.Collections;
using UnityEngine;
using WeaverCore;
using WeaverCore.Components;
using WeaverCore.Interfaces;
using WeaverCore.Utilities;

public class LungeMove : MonoBehaviour, IEnemyMove
{
    public bool MoveEnabled => true;

    Rigidbody2D rb;
    GroundDetector groundDetector;

    private void Awake()
    {
        rb = GetComponent<Rigidbody2D>();
        groundDetector = GetComponent<GroundDetector>();
		//If there is no Ground Detector on the object, then add one
        if (groundDetector == null)
        {
            groundDetector = gameObject.AddComponent<GroundDetector>();
        }
    }

    public IEnumerator DoMove()
    {
        var startPos = transform.position;
        var destPos = Player.Player1.transform.position;
        float time = 0.6f;


        //Calculate the initial velocity needed to get from the current position to the player's position in 0.6 seconds
        var lungeVelocity = MathUtilties.CalculateVelocityToReachPoint(startPos, destPos, time);

        //Set the velocity to start the lunge
        rb.velocity = lungeVelocity;

        //Wait for 0.6 seconds
        yield return new WaitForSeconds(time);

        //Wait until the enemy is touching the ground
        yield return new WaitUntil(() => groundDetector.TouchingGround);
    }

    public void OnCancel() { }

    public void OnDeath() { }
}
This move makes use of MathUtilties.CalculateVelocityToReachPoint, which allows us to calculate the initial velocity needed to travel from a start to end pososition in a certain amount of time.
We also make use of the GroundDetector component to wait until the enemy is on the ground before finishing the move.
Testing our Enemy
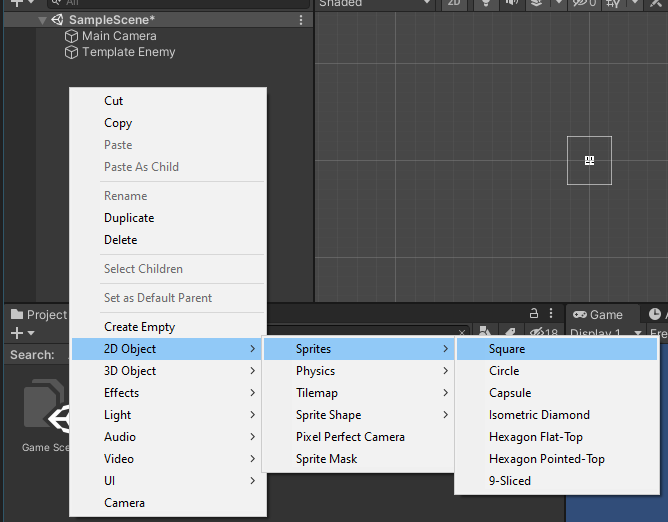
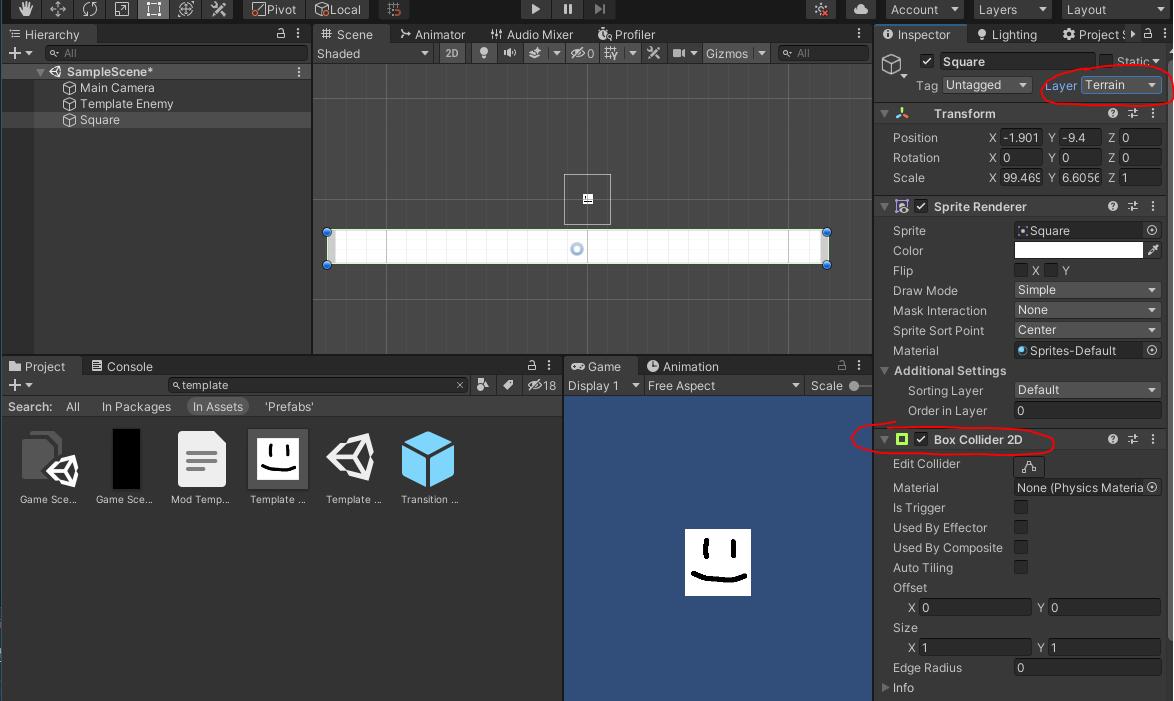
With the individual moves now implemented, we can now test out our enemy. Before we do that though, we should add some ground so the enemy doesn't fall into an endless void. We can do this by creating a simple Square Sprite, and giving it a BoxCollider2D. NOTE: The layer of this object must be set to "Terrain".
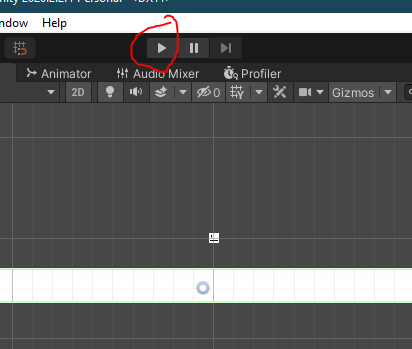
Now we can hit the "Play" button in the Unity Editor to test out our creation:
Except... when we enter play mode, we get an error in the console saying "There is no test player currently in the game"
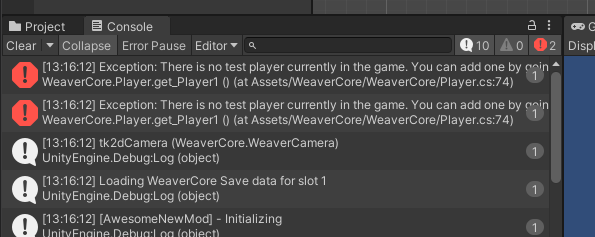
Because our enemy's logic relies on there being a player in the game, it throws an error because we currently don't have a player in the scene to test with. We can fix this by going to WeaverCore -> Insert -> Demo Player, to insert a player into our scene.
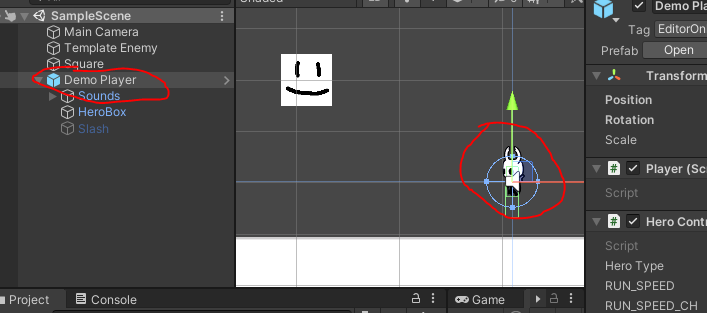
This demo player is a very basic version of the knight, with only the abilities to move around, double jump, and attack.
Controls
| Control Type | Input |
|---|---|
| Basic Movement | WASD or Arrow Keys |
| Attack | X Key |
| Jump and Double Jump | Z Key |
Controllers are also supported!
With the knight now inserted, we can play the game and see our enemy in action!
Creating bosses
Now, lets convert our new enemy into a boss. Only a few modifications need to be done. First, the CustomEnemy should inherit from Boss instead of Enemy. Second, instead of using IEnemyMove, you should be using IBossMove for each of the moves:
CustomEnemy.cs
using System.Collections;
using System.Collections.Generic;
using UnityEngine;
using WeaverCore.Features;
using WeaverCore.Interfaces;

//--//--//--//--//--//--//--//This class inherits from Boss now
public class CustomEnemy : Boss
//--//--//--//--//--//--//--//--//--//--//--//--//--//--//--//
{
	//--//--//--//--//--//--//--
    IBossMove[] moves;
	//--//--//--//--//--//--//--

    uint mainRoutineID;

    void Start()
    {
		//--//--//--//--//--//--//--//--//--//--//--//--//
        moves = GetComponents<IBossMove>();
		//--//--//--//--//--//--//--//--//--//--//--//--//
        mainRoutineID = StartBoundRoutine(MainRoutine());
    }

    IEnumerator MainRoutine()
    {
        //Loop forever
        while (true)
        {
            foreach (var move in moves)
            {
                yield return RunMove(move);

                //Wait 0.5 seconds before going to the next move
                yield return new WaitForSeconds(0.5f);
            }
        }
    }
}
LungeMove.cs
using System.Collections;
using UnityEngine;
using WeaverCore;
using WeaverCore.Components;
using WeaverCore.Interfaces;
using WeaverCore.Utilities;

//--//--//--//--//--//--//--//--//Move inherits from IBossMove now
public class LungeMove : MonoBehaviour, IBossMove
//--//--//--//--//--//--//--//--//--//--//--//--//--//--//--//--//
{
    public bool MoveEnabled => true;

    Rigidbody2D rb;
    GroundDetector groundDetector;

    private void Awake()
    {
        rb = GetComponent<Rigidbody2D>();
        groundDetector = GetComponent<GroundDetector>();
        if (groundDetector == null)
        {
            groundDetector = gameObject.AddComponent<GroundDetector>();
        }
    }

    public IEnumerator DoMove()
    {
        var startPos = transform.position;
        var destPos = Player.Player1.transform.position;
        float time = 0.6f;


        //Calculate the initial velocity needed to get from the current position to the player's position in 0.6 seconds
        var lungeVelocity = MathUtilties.CalculateVelocityToReachPoint(startPos, destPos, time);

        //Set the velocity to start the lunge
        rb.velocity = lungeVelocity;

        //Wait for 0.6 seconds
        yield return new WaitForSeconds(time);

        //Wait until the enemy is touching the ground
        yield return new WaitUntil(() => groundDetector.TouchingGround);
    }

    public void OnCancel() { }

    public void OnDeath() { }

	//--//--//New function provided by IBossMove
    public void OnStun() { }
	//--//--//--//--//--//--//--//--//--//--//
}
SlideMove.cs
using System.Collections;
using UnityEngine;
using WeaverCore;
using WeaverCore.Interfaces;
using WeaverCore.Utilities;

//--//--//--//--//--//--//Move inherits from IBossMove now
public class SlideMove : MonoBehaviour, IBossMove
//--//--//--//--//--//--//--//--//--//--//--//--//--//--//
{
    [SerializeField]
    float moveSpeed = 5f;

    [SerializeField]
    float moveDuration = 10;

    public bool MoveEnabled => true;

    Rigidbody2D rb;

    private void Awake()
    {
        rb = GetComponent<Rigidbody2D>();
    }

    public IEnumerator DoMove()
    {
        //Run the Move() function every frame until 10 seconds have elapsed
        yield return CoroutineUtilities.RunForPeriod(moveDuration, Move);

        //Stop moving when finished
        rb.velocity = Vector2.zero;
    }

    void Move()
    {
        //If the player is to the right of the enemy
        if (Player.Player1.transform.position.x >= transform.position.x)
        {
            //Set the horizontal velocity to move to the right
            rb.velocity = rb.velocity.With(x: moveSpeed);
        }
        //Otherwise, if the player is to the left of the enemy
        else
        {
            //Set the horizontal velocity to move to the left
            rb.velocity = rb.velocity.With(x: -moveSpeed);
        }
    }

    public void OnCancel()
    {
        //Stop moving if the move is cancelled
        rb.velocity = Vector2.zero;
    }

    public void OnDeath()
    {
        //Stop moving if the enemy dies while this move is running
        rb.velocity = Vector2.zero;
    }

//--//--//--//New function provided by IBossMove
    public void OnStun()
    {
		//Stop moving if the enemy is stunned while this move is running
        rb.velocity = Vector2.zero;
    }
//--//--//--//--//--//--//--//--//--//--//--//
}
The Boss class shares many of the same things the Enemy has, but with two key additions:
- The ability to get stunned
- Multiple Phases/Stages
Bosses can have stun moments, which occur when their health depletes to a certain point. When a stun occurs, all routines started via StartBoundRoutine are stopped, any move that was running is stopped, and the boss's phase counter also gets increased (BossStage).
Stuns can be useful to execute a certain action when a certain health milestone is reached, whether it be giving the player a chance to heal, or to make the boss more difficult.
Lets add a stun to our new boss. If the health of the boss goes below 50%, then the boss will have a shorter delay between moves:
using System.Collections;
using System.Collections.Generic;
using UnityEngine;
using WeaverCore.Features;
using WeaverCore.Interfaces;

public class CustomEnemy : Boss
{
    IBossMove[] moves;

    uint mainRoutineID;

    float moveDelay = 0.5f;

    void Start()
    {
        moves = GetComponents<IBossMove>();
        mainRoutineID = StartBoundRoutine(MainRoutine());

//--//--//--//--//--//--//--//--//--//--//--//--//--//--//--//--//--//--//--//--
        //When the health is depleted to 50%, trigger a stun
        AddStunMilestone(Health.Health / 2);
//--//--//--//--//--//--//--//--//--//--//--//--//--//--//--//--//--//--//--//--
    }

    IEnumerator MainRoutine()
    {
        //Loop forever
        while (true)
        {
            foreach (var move in moves)
            {
                yield return RunMove(move);

                //Wait a bit before going to the next move
                yield return new WaitForSeconds(moveDelay);
            }
        }
    }

//--//--//--//--//--//--//--//--//--//--//--//--//--//--//--//--//--//--//--//--
    //Called when the boss is stunned
    protected override void OnStun()
    {
        base.OnStun();
        //When the boss is stunned, cut to move delay in half
        moveDelay /= 2f;

		//Since all bound coroutines get stopped when stunned, we need to start the MainRoutine again
        mainRoutineID = StartBoundRoutine(MainRoutine());
    }
//--//--//--//--//--//--//--//--//--//--//--//--//--//--//--//--//--//--//--//--
}
We will also modify the SlideMove so that when the boss is in its second stage, the boss will slide faster:
using System.Collections;
using UnityEngine;
using WeaverCore;
using WeaverCore.Features;
using WeaverCore.Interfaces;
using WeaverCore.Utilities;

public class SlideMove : MonoBehaviour, IBossMove
{
    [SerializeField]
    float moveSpeed = 5f;

    [SerializeField]
    float moveDuration = 10;

    public bool MoveEnabled => true;

    Rigidbody2D rb;
    Boss boss;

    private void Awake()
    {
        rb = GetComponent<Rigidbody2D>();
//--//--//--//--//--//--//--//--//--//--//--//--//--//--//--
        boss = GetComponent<Boss>();
//--//--//--//--//--//--//--//--//--//--//--//--//--//--//--
    }

    public IEnumerator DoMove()
    {
        //Run the Move() function every frame until 10 seconds have elapsed
        yield return CoroutineUtilities.RunForPeriod(moveDuration, Move);

        //Stop moving when finished
        rb.velocity = Vector2.zero;
    }

    void Move()
    {
//--//--//--//--//--//--//--//--//--//--//--//--//--//--//--
        float speed = moveSpeed;
        //Double the slide speed if the boss is on stage 2
        if (boss.BossStage == 2)
        {
            speed *= 2;
        }
//--//--//--//--//--//--//--//--//--//--//--//--//--//--//--

        //If the player is to the right of the enemy
        if (Player.Player1.transform.position.x >= transform.position.x)
        {
            //Set the horizontal velocity to move to the right
            rb.velocity = rb.velocity.With(x: speed);
        }
        //Otherwise, if the player is to the left of the enemy
        else
        {
            //Set the horizontal velocity to move to the left
            rb.velocity = rb.velocity.With(x: -speed);
        }
    }

    public void OnCancel()
    {
        //Stop moving if the move is cancelled
        rb.velocity = Vector2.zero;
    }

    public void OnDeath()
    {
        //Stop moving if the enemy dies while this move is running
        rb.velocity = Vector2.zero;
    }

    public void OnStun()
    {
        //Stop moving if the enemy is stunned while this move is running
        rb.velocity = Vector2.zero;
    }
}
Now lets test out the boss. The boss will get harder after half it's health is depleted:
Adding it to the game
Now that our new boss is completed, we now need to figure out how it's going to be added to the game. There are two ways we can do this:
Method 1 - Replacing an existing Enemy/Boss
The easiest method is to replace an existing boss. To make our new boss replace an existing one, we need to inherit from either BossReplacement or EnemyReplacement
using System.Collections;
using System.Collections.Generic;
using UnityEngine;
using WeaverCore.Features;
using WeaverCore.Interfaces;

//--//--//--//--//--//--//Now inherits from BossReplacement
public class CustomEnemy : BossReplacement
{
    IBossMove[] moves;

    uint mainRoutineID;

    float moveDelay = 0.5f;
	...
}
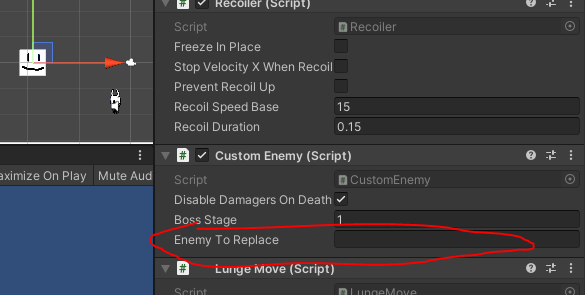
When we head back to the Unity Editor, you will see a new field on the CustomEnemy component. This is where we put the name of the enemy we want to replace.
Now we need to find the name of the enemy we want to change. Luckily, WeaverCore provides a way of finding the exact name of an enemy in-game. First, start up the game with the WeaverCore mod installed. Then, go to the area with the enemy/boss you want to change. For this tutorial we will use Marmu. To get the name of Marmu, you will need to pause the game and open the debug tools by pressing CTRL and Numpad 7 on your keyboard (or you can open it via the WeaverCore Settings Menu). It is from here we can find the exact name of Marmu:
Note
This is just one way of getting the name of an enemy. Another way would be to use Debug Mod and find the name in the "Enemies" list
In this case, the exact name we want is "Ghost Warrior Marmu", and that is the name we put into this field to replace Marmu with our own custom enemy.

Adding the enemy to the registry
Now we need to drag the enemy object into the "Assets" folder to create a prefab of our enemy:
And finally, add the enemy as a new entry into the mod's registry:
Now you can build the mod via WeaverCore -> Compilation -> Mod, start up the game, and see your newly created enemy in the game!
...Except, there is one slight problem. When the boss dies, we aren't sent back to Godhome. We are stuck in this room forever. This is an easy fix however, we just need to trigger the ending sequence when the boss dies:
public class CustomEnemy : BossReplacement
{
	...
    //Called when the boss is stunned
    protected override void OnStun()
    {
        base.OnStun();
        //When the boss is stunned, cut to move delay in half
        moveDelay /= 2f;

        //Since all bound coroutines get stopped when stunned, we need to start the MainRoutine again
        mainRoutineID = StartBoundRoutine(MainRoutine());
    }

//--//--//--//--//--//--//--//--//--//--//--//--//--//--//--//--//--//--//--//--
    //Called when the boss dies
    protected override void OnDeath()
    {
        base.OnDeath();

        //After two seconds, end the boss battle and return to godhome
        Boss.EndBossBattle(2f);
    }
//--//--//--//--//--//--//--//--//--//--//--//--//--//--//--//--//--//--//--//--
}
Now, when the boss dies, the ending sequence will get triggered after 2 seconds:
Method 2 - Manually Instantiating it (Advanced)
The other option is to instantiate it manually via GameObject.Instantiate or something similar. To do this, first create a prefab of the enemy and add it to the registry (just like in Method 1).
Then, to load the prefab from the registry at any time, you can call Registry.GetFeatures to load the enemy prefab. Then you can use GameObject.Instantiate to create the enemy in-game:
public void LoadEnemy()
{
	//Load the prefab
    var enemyPrefab = Registry.GetFeature<CustomEnemy>();

    //Instantiate the enemy
    var instance = GameObject.Instantiate(enemyPrefab);
}